Pro-Tour with NESEA – May 1st
As part of being recognized by NESEA’s Zero Net Energy Building Award, we will be hosting a Pro-Tour with NESEA at our home on May First. In addition to standard tour faire, there will be in depth discussions about the building science, design, and systems that make our home work. There will be a presentation and reception at the Guiding Star Grange down the street from our home. Space is limited so sign up soon. Register at:
http://nesea.org/be-event/2015-zero-net-energy-building-award-winner-pro-tour
Modern Strawbale Design
Friends of ours in Brattleboro Vermont are building a strawbale timberframe home for themselves. Early on in our design process for our own home we considered such a building, but decided it wasn’t right for us at that time. Chad Mathrani has got us thinking about it again and shows us how to integrate modern building science with natural building traditional techniques. The result: a meticulously designed and crafted home that will be standing for hundreds of years. If you are looking to build or learn about building we recommend checking out Chad’s business: Vermont Natural Homes. Also, 475 High Performance Building Supply put together a great interview with Chad.
Updated Interior Photographs
We recently had our friend Beth Reynolds from Base Camp Photo over to shoot pictures of the interior. Check out her pictures on our Photographs page.
Updated Plans Available
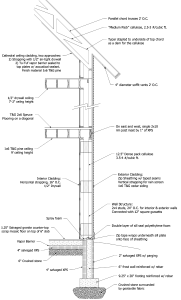
In preparation for our presentation at Building Energy 15 I redrew the floor plans and wall detail diagrams so they are more user-friendly. Full CAD plans also available on our Architectural Plans Page. Click on images for larger versions.
- First floor plan. 9′ Ceilings throughout.
- Second floor plan. The bedroom at left has a ceiling height of about 7′-2″. The bedroom at right has a cathedral ceiling and a loft accessible from the the third floor room. The bathroom, hall, and closet are all cathedral ceiling.
- The third floor office space is tucked into the peak of the roof. Its north knee wall is about 4′ and its south is about 16″. The height peaks at about 7′ just above the center of the stairs.
Award Winning
Incredible News: We are the recipient of the 2015 Zero Net Energy Building award from NESEA! There is an article about us in today’s Greenfield Recorder and Hampshire Gazette: http://www.gazettenet.com. A huge thank you to everyone who helped with this project especially Adam Heintz, Scott Baum, Peter Talmage, Hannah Smeltz, my parents, Thom Burden, John Scanlon, and Whip Withington. I will be in Boston for most of this week at the NESEA- Northeast Sustainable Energy Association Building Energy Conference where I will be honored to present on our house.
Light Bulb Cost Comparison
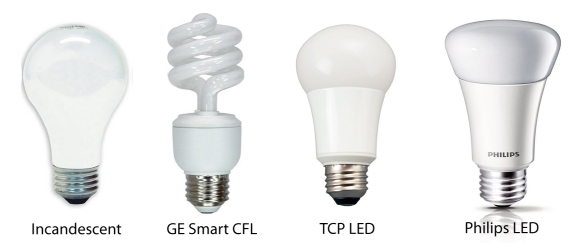
I did a presentation at the Garlic and Arts Festival in Orange Massachusetts this past weekend on home energy efficiency. For it, I prepared a slide comparing light bulb costs. The title of my slide on the topic became “Congratulations LED’s! You Did It!” Why? On Amazon, you can now by LED’s that are so cheap that they pay themselves in about 6 months! Here is a chart that shows off all the details:
| Bulb Comparison 10/14 | Cost of one bulb no shipping | Watts | Cost to run for 1 year | Savings per year if replacing an incandescent bulb | When replacing an incandescent, Pays for itself in… (months) |
| GE Incandescent (Amazon 4 Pack) | $1.00 | 60 | $14.89 | ||
| GE CFL (Amazon 8 Pack) | $1.38 | 13 | $3.23 | $11.67 | 1.4 |
| TCP LED (Amazon 6 Pack) | $6.64 | 10 | $2.48 | $12.41 | 6.4 |
| Philips LED (EFI Single Bulb) | $12.95 | 11 | $2.73 | $12.16 | 13 |
| Cost for one year assumes 4 hrs per day and cost of electricity .17 cents per kW | |||||
A PDF of the above chart with even more details including color temperature (all about 2700 K), lumens (all about 800), and dimmability is available here: Light bulb cost comparison.pdf
I can vouch for both the TCP bulbs and the Philips. I have some of both in my house and they produce lots of nice warm light.
Go Spartan Solar!
Last May I left my job installing solar electric and solar hot water systems. Since then, I have been working towards starting my own business and I am proud to announce Spartan Solar! We are focusing on solar hot water to start. Learn more about our services at: goSpartanSolar.com.
America’s First Super-Insulated Buildings
America’s First Super-Insulated Buildings
In the 1800’s and into the early 20th century we used to get our refrigeration done using ice–including during the summer. Ice was harvested and stored in specially designed buildings and then distributed/used as needed. I recently happened across a thorough article on the topic in the journal of Early American Industries: The Chronicle Vol 66 #4. There is much interesting history in the article, but the relevant part was about the specially designed buildings. They were often made with none other than double stud walls with 10-12″ off sawdust insulation. In other words: cellulose! For those that are just starting to read this blog, our super-insulated home is exactly that: double stud, 2×4 and 2×4 walls, with 12.5″ of dense packed cellulose. I thought we were on the forefront of super-insulation design by having such a wall system, but we are actually implementing designs that are over 100 years old!
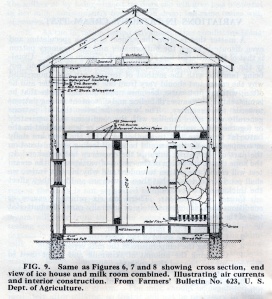
The author of the article, Paul Wood, in addition to fielding questions, kindly sent me high resolution images of plan and layout designs for a typical farm (non-commercial) ice house. The images, shown below, are from The October 1914 Vermont Department of Agriculture Bulletin. Here are some of my observations of the assembly:
– The double stud wall has a 4″x10″ bottom plate, with 2 sets of offset 2×4’s connected and spaced with a single horizontal 2×4 roughly mid-way between the top and bottom of the balloon framed studs.
– The exterior sheathing consists of a single layer of 7/8″ tongue and groove boards faced with “waterproof insulating paper” and sided with novelty siding or similar. The interior is sheathed with 2 layers of 7/8″ tongue and groove boards sandwiching similar paper. Unfortunately, I am unable to provide any insight into what the composition of what this insulated paper might be. Perhaps it was simply tarred felt paper? The double layer of interior sheathing is interesting; perhaps this was just to protect the insulating paper?
– I was surprised and impressed to see that triple pane glazing was used!
– There is a sophisticated appreciation of air flow and drainage.
– “Tarred Felt” was extended vertically part way into the top of the stem-wall–a detail whose purpose I am not sure of.
– Although the diagrams below show more sawdust used for horizontal insulation above the ice, Paul Wood informs us that marsh grass, and occasionally straw, up to 24″ thick, was commonly used directly on top of the ice. Marsh grass was preferred for its rot resistance. I wonder if there is a lesson here that would be worth re-learning? Folks who are interested in natural building and straw-bale design need to be vigilant in protecting the bales from decay–perhaps marsh grass bales would be a useful alternative?
– Noted in Paul’s article and not on the diagrams, white-wash was sometimes used to keep the ice-house buildings cooler. Also, the sawdust would have to be replaced annually, since it would degrade.
Click on images for high-res versions
|
|
|
Back draft dampers
In our post a couple of years ago on thermal imaging of our home, we noted that we were losing quite a bit of heat through our 2 bathroom fans. In fact, if one were to put one’s hand next to the fan (while off) you could feel cold air coming right on in. While surfing the web for a solution I found these retrofit back draft dampers:
Installing one in the first floor bathroom fan was easy since the duct-work was exposed in the mechanical room. After putting one in the duct, I was, however, disappointed to still feel cold air coming through the damper, primarily through the hinge. I have seen some models where the hinge is taped, and I considered adding tape myself, but I was worried that the tape may not last/or actually cause problems. Instead, I put two dampers in the duct, which satisfactorily blocked the flow of cold air.
The second floor bathroom fan duct-work is permanently not accessible so I removed the fan from its box exposing the beginning of the duct. This was challenging only because the fan is 12′ up on a cathedral ceiling.
The downstairs bathroom went from being drafty and cool to being the warm interior space you would expect. The fans make a bit more noise as a result of the added air resistance, but I am not too worried. The Panasonic fans have variable speed motors in them and are designed to compensate for duct-work resistance.
I would recommend these dampers to anyone who is looking for easy improvements to their home’s energy efficiency. I bought mine from IAQ Source which seemed to have a better price than most. If you are building new, it would be cheaper to use an in-line backdraft damper like Fantech’s which also wouldn’t restrict the air-flow as much.


